Categories
Breakfast

PRESERVING SUMMER

Strawberry Preserves | for the love of the south

May means the beginning of strawberry season. Strawberries are the first fruit to kick off the parade of summer produce. A procession of peaches, blackberries, muscadines and figs quickly follow. I finally finished writing and editing my cookbook and am in desperate need of sunshine and loads of preserving. Preserving seems to unsettle some, but to me it’s relaxing. I love gathering quilted glass jars and watching them reflect in the morning light onto my white marble countertops, listening to the blip, blip, blip of the strawberries as they schmooze with the melting vanilla sugar. In a matter of moments, the kitchen fills with a fragrant cloud of sweet strawberries. To me, preserving is a practical, tangible way of suspending a moment in time before it has a chance to pass me by.

Preserving | for the love of the south

Whenever I bring strawberries home, I tip them into a bowl filled with 1 part distilled white vinegar to 4 parts cold water. Let them sit in the vinegar water for 10 minutes. Swish the berries around and rinse well in cold water. Line a rimmed baking sheet or plate with paper towels and allow the berries to air dry in a single layer. If you aren’t using the berries that day, cover loosely with paper towels and stash them away in the fridge for 3-5 days. (The vinegar water cleans the berries and keeps the berries fresh for a few days.) To hull the strawberries, take a paring knife in one hand and a strawberry stripped of its leaves in the other. Spin the strawberry around the tip of the paring knife, removing the green stem and white column in the center of the berry.

Strawberries | for the love of the south

I love serving these preserves on hot toast slathered with butter, or on waffles, pancakes and French toast. They are beautiful folded into softly whipped cream or spooned over vanilla ice cream for effortless summertime desserts.

Strawberry Preserves | for the love of the south

Strawberry & Vanilla Bean Preserves

Adapted from Canal House Cooks Everyday

Makes 4, half-pint jars

Note: The lemon peel serves two purposes. The first is for flavor, but the second is the most important. Strawberries, like most soft fruits, are low in pectin, but citrus pith is high in pectin. (It’s what gives marmalades that beautiful jelly-like consistency.) Make sure you don’t skip on the pith!

1½ cups granulated sugar

1 vanilla bean, cut in half lengthwise, seeds scraped out

4 cups organic strawberries, washed and hulled, larger berries cut in half

Peel of 1 lemon, including the white pith (See Note)


Blitz granulated sugar and the vanilla bean seeds in a food processor for 30 seconds. Set aside.

Tumble the hulled strawberries in a heavy-bottomed pot. Fold in the sugar and bring to gentle boil over medium heat stirring occasionally, about 5 minutes. Using a slotted spoon, gently lift the berries from the syrup and lower them into a shallow bowl. Add the lemon peel to the syrup and bring to boil for about another 5 minutes, or until the syrup has thickened. Remove from the heat. Let the syrup cool slightly, and then slide the berries back in the syrup. Cover and set aside at room temperature, about 6 hours or overnight. Remove the lemon peel and ladle the preserves in sterilized jars and stash away in the fridge up to 1 month.


Categories
Breakfast

APPLE FRITTERS & AN ANNOUNCEMENT

fj9b1001

Professor Moser was my English professor as well as a sort of grandmother figure to me during my freshman year of college. She was a petite, elegant woman with excellent posture and perfectly coiffed hair. She would prefer for me to say she was more of a godmother figure than a grandmother because she was oblivious of her age. We spent time after class in lively debates about novels, classic movies, and, of course, food. She was full of wisdom, and I astutely sat next to her soaking it all in. So, when the first lovely autumn day arrived in Waco that year, she declared it the perfect day for a long lunch.  We piled into her sleek white Cadillac and made our way down a long winding road, which at the time felt like it led absolutely nowhere, but she assured me the road steered us to her favorite little café in the heart of a quaint Amish community.

We sat in the center of the dining room, under stained glass windows and beautiful wooden beams. There was a steady fire in the stone fireplace. (It was pleasant even though it wasn’t quite cold enough for a fire, but it reminded me of my grandmother in Louisiana who lights a fire whenever the temperature dips below 60oF.) We enjoyed a meal of roasted meats, bread made from freshly milled flour and lettuces picked from a garden located just behind the restaurant. When it was time to order dessert, I couldn’t decide between the praline ice cream or apple fritter. Both looked wonderful and seemed quite “autumnal”. We ordered two of both. “Life’s too short to choose just one dessert,” she said decisively.

img_8712

As I dipped the last crumb of fritter into a melted puddle of praline ice cream, she looked at me sternly and said, “If you don’t become a writer, you will be the biggest waste of talent I’ve ever met.” I sat stunned and secretly impressed by her polite bluntness. “Well, I’m going to be a scientist,” I said resolutely, like most young people do. She smiled and nodded, as if she had a glimpse into the future, all the while knowing I would be amazingly mistaken.

This is one of those treasured memories I keep on a shelf, always at hand. On the same shelf are words of encouragement, gentle nudges from loved ones, challenges, victories and failures. All this to say, I can look back and say the Professor was right. You see, I’ve been keeping a secret. A rather big secret.

fj9b0981

For a while now, I’ve been working behind the scenes with my agent on a proposal for my first cookbook, and I’m pleased as punch to announce it will be released March 2018 by Harper Collins! All of the recipes, with the exception of a few favorites from this site, are brand new. I can’t wait to share them with you! Thank you for your words of encouragement along the way, for emailing me letting me know my grandma’s blackberry pie recipe was the hit of your family dinner, and for sharing your personal experiences from home.

Here’s to a season of new adventures! x Amber

 fj9b1002

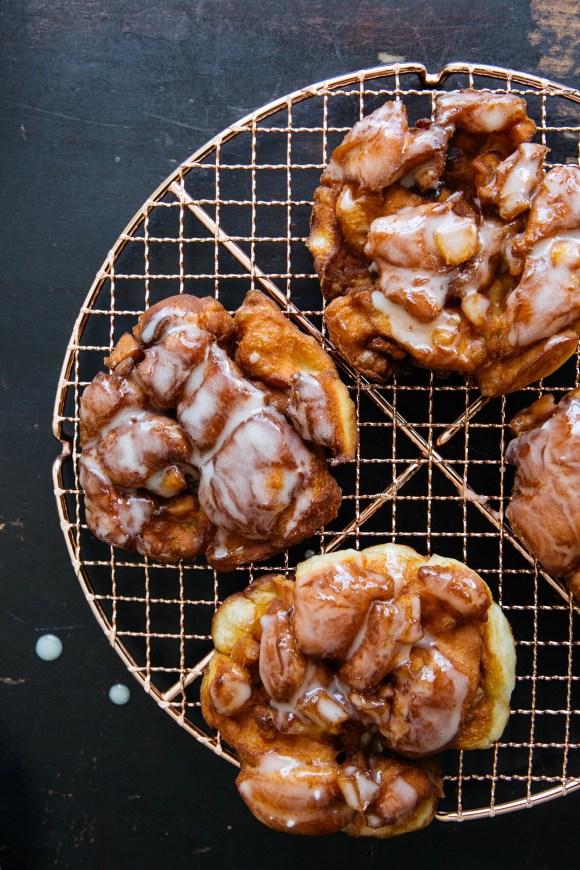
Vanilla Bean Glazed Apple Fritters

Makes 6

Note: To make the Vanilla Bean Glaze simply whisk together 1 teaspoon vanilla bean extract, 2 tablespoons milk and ¾ cup powdered sugar in a shallow bowl just before frying the fritters.

1 cup all-purpose flour

1½ tablespoons granulated sugar

½ teaspoon kosher salt

¾ teaspoon instant yeast

1 egg, room temperature

½ teaspoon lemon zest

3 tablespoons warm water

3 tablespoons unsalted butter, room temperature, divided

1 teaspoon ground cinnamon

2 tablespoons raw cane sugar

1 large apple, peeled, cored, cut into ½” chunks

Vegetable oil, for frying


In the bowl of a mixer fitted with a beater attachment, combine flour, sugar, salt, yeast, egg, zest, and water. Beat on a medium speed for 8 minutes, or until the dough begins to pull away from the sides of the bowl and forms a ball. Allow the dough to rest for 1 minute.

Start the mixer up again on medium speed and slowly add 2 tablespoons of butter, about a teaspoon at a time.

Once the butter is incorporated, mix on a high speed for 5 minutes until glossy, smooth and elastic.

Turn the dough into a lightly greased bowl. Cover with plastic wrap and let rise until doubled in size, about 2 hours.

Knead the dough for a moment, just to let the air out, recover, and chill for 24 hours.

In a medium-sized skillet over medium heat, melt remaining 1 tablespoon butter, cinnamon, raw cane sugar and apple. Cook for 10 minutes, or until tender. Allow the filling to cool either on the countertop at room temperature or in the fridge until you are ready to make the fritters.

After 24 hours, plop the dough onto a generously floured surface. Press the dough into a 12×9” rectangle. Spread the apples onto half of the dough and fold the remaining half over the apples. Pinch the edges together.

Using a knife or a pastry scraper, cut dough into ½” strips, then cut crosswise into ½” strips again. Repeat this process again, but this time on the diagonal.

Flour your hands well and gather the dough pieces together to for a log.

Slice the log into 6 equal pieces.

Transfer the fritter dough onto 2 rimmed baking sheets dusted with flour. Flatten the fritters while pressing them together. I mean flatten! This will ensure the fritters will not fall apart when fried. Loosely cover with plastic wrap and let the fritters rise for 1 hour.

In a heavy bottomed pot over medium-high heat, heat 2” of oil until it reaches 360oF.

Using a spatula, gently lower the fritter dough into the oil. Don’t crowd the pot. (I fry 1-2 at a time!) The fritters fry quick, about 2 minutes per side, or until golden brown and fully cooked.

Remove the fritter with a spider or slotted spoon onto a plate lined with a paper towel.

While the fritters are still warm, dip the top of the fritter into the glaze. Allow the glaze to set and enjoy!

Categories
Breakfast Uncategorized

KINGS OF THE BAYOU

Fig & Bacon Quiche | for the love of the south

All of my memories begin and end with food, and so all of my recipes are inspired by memories. It’s a mutual relationship. Characters develop around kitchen islands, barbecue pits, and dining room tables. Personalities are woven in between strings and strings of meals, revealing a colorful backdrop for every story I recount. Everyone I grew up around would be considered food obsessed, although no one pointed it out or even mentioned it because we were oblivious to the fact since we all thought about food the same. We would chat about what we were having for lunch at the breakfast table, dinner at lunch, so on and so forth. It was a never-ending discussion.

Almost everyone I knew lived in a modest home with enough yard for a simple garden filled with tomatoes, okra, and peppers, a satsuma and fig tree. Every once in a while, the occasional chicken or pig could be spotted running around backyards, feasting on herbs. We didn’t have a lot in the eyes of the world, but we ate like kings. Even if our table was littered with crawfish peelings, our throne looked more or less like a broken in La-Z-Boy recliner and our crowns denoted favored football teams. We ate like kings. That’s all that mattered.

Fresh Figs & Bacon | for the love of the south

{This particular recipe reminds me of a story my dad told me recently. He and his younger brother would hide in my great grandma Domingue’s fig tree. The tree was strategically positioned over their chicken coop. There, they sat in the branches waiting for the opportune moment. Just as the hens began laying eggs…pew pew pew! They would pelt the foul fowls with large green figs, not the smallish purple ones, naturally. The naughty prank would result in the mystery of the hens that wouldn’t lay eggs, which just so happened to coincide with fig season.}

Fig & Bacon Quiche | for the love of the south

Fig & Bacon Quiche

Serves 6

Note: This quiche is at its best right after it’s had time to cool for a few minutes, right out of the oven! If left at room temperature too long, the figs lose their appeal. They leave a blue ring around the filling as they pull away. Also, the flavor and texture of the figs are at their height when piping hot!

1¼ cup all-purpose flour

½ teaspoon kosher salt, plus ¾ teaspoon for filling

½ cup (1 stick) unsalted butter, cubed, chilled

¼ cup cold water

½ oz. bourbon

¼ cup ice cubes

4 large eggs, room temperature

1 cup heavy whipping cream

4 bacon slices, cut into thin strips

6 fresh figs, trimmed, halved

1 egg white, for brushing

Kosher salt and black pepper, for seasoning


In a mixer fitted with the paddle attachment, combine flour and salt. Add the cold butter to the flour mixture. On low speed, combine the ingredients until the mixture looks like coarse sand. Make sure there are no pieces of butter larger than the size of a pea, and do not over blend

In a small bowl combine cold water, bourbon and ice.

Tablespoon by tablespoon, add the ice water mixture to the flour and butter mixture, mixing in between additions. Add the water until the dough comes together into a ball. The dough should be smooth, not be sticky or crumbly. Shape the dough into a disk, wrap in plastic wrap and keep in the fridge for at least 30 minutes or up to three days.

Preheat oven to 425oF

On a lightly floured surface, roll out dough until 10 inches in diameter. Gently place the dough into a 9-inch pie plate. Crimp the edges by pinching the dough between your index finger and thumb. Continue crimping the edges all the way around the edges. Place the pie plate in the refrigerator for 30 minutes.

Take the pie plate out of the fridge, and with the tines of a fork, poke the bottom and sides of the dough 15-20 times. This step is called docking and will prevent the dough from puffing up as it bakes. Place the pie plate in the freezer for 10 minutes.

With a pastry brush, brush the bottom and sides of the crust with the egg white. The egg white creates a barrier between the filling and the piecrust as it bakes keeping the crust from getting soggy. Bake for 3 minutes and allow the quiche shell to cool while preparing the filling.

Reduce oven temperature to 350oF

Whisk eggs, cream, remaining ¾ teaspoon salt, and freshly cracked black pepper until well combined and fluffy. Set aside.

In a medium cast-iron skillet over medium heat, cook the bacon until brown and crisp. Remove the bacon from the pan and drain on a paper towel-lined plate. Scatter fig halves cut side up and crisp bacon onto the bottom of the prepared pie shell. Add the egg and cream mixture over the figs and bacon.

Place in the preheated oven for 40 minutes or until the top is slightly golden, edges are lightly browned and the filling is set in the center. Allow the quiche to cool for 10 minutes before serving. Enjoy!


Categories
Breakfast

HOW TO EAT ALONE

Black Pepper, Grapefruit with Local Honey & Yogurt | for the love of the south

I never truly knew who he was. I saw him every Saturday morning at precisely 11 o’clock at a restaurant I worked at as a hostess after I graduated high school. He was a short, thin elderly gentleman dressed in creased tweed slacks and a crisp button down shirt with a local Waco newspaper tucked under his right arm. Wrinkles around his eyes and cheeks folded gently into each other as he greeted me. His wide, toothsome smile was stained from a lifetime of daily indulgences: coffee, red wine and pipe tobacco. We walked through the restaurant to his favorite table, table number 26. The small, circular bistro table was the second to last in a row of identical tables in the atrium. The atrium was long and narrow. Small windowpanes stretched from the floor to the curved ceiling, which poured sunshine into the otherwise dark restaurant. I sat with him for just a few minutes before having to dash away as the lunch crowd began to pick up.

He sat at table number 26 for nearly two hours. He ordered two glasses of red wine, one he drank with his appetizer and the other with his entrée. He ordered lightly battered and fried sweet onion rings, spritzing them with lemon before each bite. Filet mignon crowned with a pat of bleu cheese butter was always his entrée of choice. He let it sit undisturbed for just a few minutes, allowing the butter to melt and drip down the sides of the seared meat before plunging his knife into the steak, revealing its blushing medium rare center. As he enjoyed his meal, he would alternate between people watching and reading his newspaper, spectacles balancing dangerously close to the end of his nose. He sat with his right leg draped over his left. His foot bounced in the air every few seconds, drawing attention to his tiny, shiny doll-like shoes. Coffee arrived with a small silver cup of cold cream and a plate of milk chocolate cake sitting on top of a pool of dark chocolate ganache scattered with berries. Usually by this time, the lunch crowd dwindled enough for me to be able to sit with him again as he enjoyed his dessert. He called it his “treat of the week.” He reminded me of a giddy schoolboy as he ate bite after bite of chocolate cake, gently swiping each forkful across the plate, soaking up as much chocolate ganache as possible.

Blood Orange Juice | for the love of the south

For many months, I was curious as to why he never invited anyone to come and eat with him at his favorite restaurant at table number 26. He certainly wasn’t a recluse or without friends or family to spend time with. He was a widower, but his children and grandchildren lived in town. After a few months passed, the answer became clear.

Most people are embarrassed of eating alone or try to avoid it completely. He dined alone intentionally, and savored every second. What I learned from him never came from conversation. Silently and unknowingly, he taught me a great lesson: how to eat alone and enjoy the company.

Grapefruit with Yogurt & Black Pepper:

Serves 1, deliberately

Note: Whenever I find myself eating alone, I tend to pay as close attention to the preparation and presentation of the dish as much as if I would be hosting a dinner. Yogurt served with seasonal fruit serves as my everyday breakfast, along with a glass of juice and mug (or occasionally a bowl) of chicory coffee laced with sweetened milk. I’m aware that this is hardly a recipe, but it’s how I start off nearly every solitary morning. When I’m alone, I gravitate to simple, balanced recipes that I can whip up in a matter of moments! 

At the moment, grapefruit and blood oranges are in season, but during the spring I swap out the citrus for strawberries and blackberries. In the summer, peaches and the fall, figs.

(The black pepper is completely optional! I enjoy adding a peppery bite to fresh citrus, but feel free to leave it out.)

1 large grapefruit, peelings removed, cut into thin sections

1/3 cup plain yogurt

1 tablespoon local honey

Freshly ground black pepper, optional

Arrange the grapefruit wedges onto a plate.

Mix together yogurt and honey and spoon the sweetened yogurt next to the grapefruit. Lightly dust the grapefruit with black pepper, if using. Enjoy!


Categories
Breakfast Entrees

FIRST SIGN of SPRING

Spring Onions + Buttercups | for the love of the south

A few weeks ago, I woke to a wintery Southern fairytale. I leaned my head back, gazed out the window above our bed and saw an icicle the length of a dagger slowly melting away. Drip, drip, drip. My heart skipped a beat. Something magical happened overnight. For those who grew up in the North, I apologize if you can’t relate to my delight of winter weather. Growing up in Louisiana, the closest I got to snow was devouring a jade spearmint snoball on the streets of New Orleans in the dead of summer.

Sautéed Spring Onions | for the love of the south

Immediately, I threw on my charcoal wool coat, slung my fur stole around my neck, and slipped into my black rubber boots. Michael and I followed our feet to one of our favorite spots in Franklin, the Carnton Plantation. It seems like this is the place we visit whenever the seasons are in their fullest glory, whether the buttercups are blooming, muscadines are ripe for the picking or the leaves are at their autumnal peak.

Spring Onion + Bacon Quiche Prep | for the love of the south

Tiny emerald green buttercup leaves popping through the perfectly blanketed snow caught my eye. Buttercups are one of the first signs of spring around here. It’s our first sign of hope. Immediately, I began dreaming of a budding quiche, sunny and yellow from fresh farm eggs and speckled green with lovely spring onions.

We continued walking the grounds of the old plantation. Its large porch flanked with rocking chairs and white columns welcomed us. As I walked across the wooden porch, there was a small groan, like a whisper underfoot. If these floorboards could speak, they would tell a story of war, loss and bloodshed. The Carnton Plantation has a rough past, much like the South itself, but with time the seasons pass, the snow melts and spring appears. Wintertime is necessary for survival, so when spring comes we are prepared; we are ready for new growth. The South has its fair share of tales, but in the end, no one can deny its present beauty, no matter the season.

Spring Onion + Bacon Quiche | for the love of the south

Recipe: Sautéed Spring Onion + Bacon Quiche

Serves 4-6

1 ¼ cup of all-purpose flour

½ teaspoon of kosher salt

½ cup of lard or unsalted butter, cubed, chilled

½ cup of ice water

1 tablespoon of apple cider vinegar

4 large eggs

1 cup of heavy whipping cream

4 rashers of bacon

½ bunch of spring onions, white and pale green parts only, cut in half lengthwise

Salt & pepper, to taste

Preheat oven to 350oF. Place a baking sheet in the oven fitted with aluminum foil.

Combine flour and salt in the bowl of a stand mixer fitted with a paddle attachment. Create a well in the center and add the lard/butter. Mix on a medium speed until the mixture looks like coarse sand.

In a small bowl, add the vinegar to the ice water. Tablespoon by tablespoon, add the ice water mixture to the flour and butter mixture, mixing in between additions. Add the water until the dough forms a ball. The dough should not be sticky or crumbly. Wrap the dough in plastic wrap and keep in the fridge for at least 30 minutes.

On a lightly floured surface, roll out the dough until 9 or so inches in diameter. Gently place the dough into an 8” pie plate. Crimp the edges. Without breaking the yolk of the eggs for the filling, use a pastry brush and gently brush a thin layer of the egg white onto the dough. This will create a barrier between the filling and the piecrust as it bakes. Prick the bottom of the pastry with a fork. Place in the fridge for 30 minutes. Meanwhile prepare the filling.

Whisk eggs, cream, salt (Keeping in mind that the bacon is already salty!) and freshly cracked black pepper until well combined and fluffy. Set aside.

In a medium cast-iron skillet over medium heat, cook the bacon until brown and crisp. Remove the bacon from the pan and add the spring onions. Sauté until the onions start to color and soften, about 2-3 minutes. Drain remaining bacon fat from the pan. Scatter sautéed onions and crisp bacon to the bottom of the pie plate. Add the egg and cream mixture over the onions and bacon.

Place in the preheated oven for 40 minutes or until the top is slightly golden, edges are lightly browned and the filling is set in the center. Serve in slices with a salad for a lovely lunch! If you have any leftovers, wrap the dish with cling film and stash in the fridge for a few days. Reheat in a low oven until completely warmed through. Enjoy!

Spring Onion + Bacon Quiche | for the love of the south

Categories
Breakfast Dessert

SATSUMA KISSES + HOLIDAY SECRETS

Satsuma Madeleines | for the love of the south

During the holidays, my grandparent’s backyard in Louisiana was home to one of my favorite treats: satsumas. Driving down the winding, gravel driveway, the smoky scent of barbecue welcomed us. Grandma waved to us from the pit with long barbecue tongs. Grandpa welcomed us with holiday cheer and glasses of sweet tea, and I made my rounds and gathered with the rest of my cousins at the shed where our beloved scooter resided.

We Louisianans are resourceful. My grandpa repaired a broken-down, abandoned three-wheeled scooter from the chemical plant he worked at, painted it fire engine red, and magically transformed it into a carriage that could hold 8 grandchildren at a time, 12 if we distributed our weight properly. It kept us occupied all day long, or at least until we ran out of gas. We peeled across the backyard, into the wooded trails, and past the fig trees. And every time we rounded the satsuma trees, we leaned to one side, stretched out our arms, and with the scooter puttering at full speed, we attempted to grab a piece of fruit. The prize for this dangerous game? Satsumas, of course!

I remember taking my rewards to my favorite place in the yard: an old, white wooden swing my grandfather built. I sat there with a pile of satsumas, admiring them as if they were spoils from a treasure trove. Rusty chains slightly creaked as I swayed back and forth, peeling my stash of jewels.

Satsumas | for the love of the south

The thin, spongy orange skin easily gave way to my tiny fingers. Citrus scented oil filled the air as I gently peeled the speckled skin away from the flesh of the satsuma. Hidden underneath was a perfectly segmented citrus fruit. Each segment stripped away effortlessly and burst with sweet juices as I bit into them. There is something special about satsumas. Shhh…it’s a secret. Hidden inside a satsuma is a tiny segment, wedged in between two larger ones; it’s called the kiss. The tradition is you share the “kiss” with someone you love. As I finished the mound of satsumas, I saved all the “kisses” in one hand, jumped off the swing and distributed the clandestine segments to members of my family. I loved watching their eyes light up with delight in the sweet, silent secret of the satsuma “kiss.”

Seasons change. The scooter, like my grandpa, has long been retired. The swing is beyond weathered and worn. Now, I live miles away, but I can’t help but think of my warm, green Christmases spent in Louisiana. As I stand close to my oven, waiting for these satsuma madeleines to bake, the citrus scent immediately transports me back to Louisiana, savoring the sweet kiss of home from the coziness of my Tennessee kitchen.

Satsuma Madeleines | for the love of the south

Recipe: Satsuma Madeleines

Makes 26 Madeleines

Note: You can substitute satsuma zest for grapefruit, orange, lemon or lime zest. If you substitute the satsuma juice for lime or lemon, decrease the amount of juice by half.

8 tablespoons (1 stick) of unsalted butter, plus more for brushing

2 tablespoons of local honey

130g granulated sugar

Zest of 1 satsuma

3 large eggs, room temperature

Pinch of kosher salt

150g of all-purpose flour, sifted

1 teaspoon of baking powder

2 tablespoons of satsuma juice

1 teaspoon of vanilla extract

Powdered sugar, for dusting

In a small skillet over medium heat, cook butter until browned. Take off heat and stir in honey. Set aside.

In a stand mixer fitted with a whisk attachment, combine sugar and satsuma zest. Rub the zest into the sugar with your fingertips. Add eggs and whisk on a high speed until pale and fluffy, about 5 minutes.

Meanwhile, whisk together salt, flour and baking powder in a small bowl.

Whisk the flour mixture into the egg mixture until combined. Add browned butter, satsuma juice and vanilla extract. Scrape down the sides of the bowl and whisk for another minute. Transfer the batter to a large plastic bag. Chill for 2 hours or up to 2 days.

Preheat oven to 375o

Brush a madeleine pan with melted butter. Cut a hole at the end of the plastic bag and pipe the batter into the molds, filling the molds ¾ of the way. Gently tap the pan onto the counter, releasing any air pockets and bake for 8-10 minutes or until golden around the edges. Arrange on a plate and dust with powdered sugar. Enjoy!


Categories
Breakfast Uncategorized

FAREWELL WINTER

Pecan Chicory Cream Dutch BabyWe were teased. Teased by pleasant weather, by the tiny, pointy buds resting on the trees and the brilliant yellow daffodils, which magically emerged from the earth. Spring was surely on its way. Then, surprisingly, I woke up last Monday morning to a wonderful, winter wonderland. Slightly muddled but still enchanted by the snowy spectacle, Michael and I grabbed our coats and boots we had hastily stashed away in the back of the closet and set out on our last possible snow day of the year.

We took a stroll, arm in arm, through sleepy downtown Franklin and wandered closer to one of our most beloved spots, the beautiful and historic Carnton Plantation. The Carnton Plantation became famous during the Civil War for reasons I will lovingly spare you from. We slowly trekked the frozen ground, taking in the stillness of the landscape. Vibrant daffodils stared at us with their luminous, trumpet faces, reminding me to cherish this passing winter’s day.

The only sounds on the estate were the crunching of my black wellies underfoot and the soft, trickle of snow falling to the ground. Everything was still. It gave me a chill how eerie the plantation grounds felt. Here, on the same land where many men fought on crimson soil, we stand in bliss over a blanket of white snow.

After rambling through the main manor, we made our way to the back of the grounds where a secret, swampy area teems with life. We spotted a family of mallards having a morning swim, each of them taking turns ducking under the glassy surface, only to have beads of water swiftly glide off their backs.  Fog slowly crept across the water like a fold of delicate tulle gently, slowly unraveling from its seams. Flotsam from an old, cockeyed structure in the swamp jarringly thumped against the side of the building, waking us from our wintery daydream.

Carnton PortraitWe ran back to the car with stiff, frozen limbs and glided away. I sat there thinking of winter and hoping this was its farewell finale. If this was winter’s way of saying goodbye, then I believe the occasion calls for creating something special with the rest of the lovely pecans I’d been hoarding. This pecan and chicory cream is earthy and slightly surreptitious in nature, just like our winter spectacle. Hopefully I’ve taken off my heavy coat for the last time this season. Until next time dear winter…it’s been grand.

Recipe: Pecan & Chicory Cream

Makes about 1 ½ cups

Note: Pecan & Chicory Cream can be covered on toast, cake or spread across the top of a Dutch Baby (recipe below) sprinkled with pecans, powdered sugar and melted chocolate!

200g of slightly toasted pecan halves

1 cup of heavy whipping cream, plus more if needed

2 tablespoons of cane sugar

2 teaspoons of vanilla extract

2 tablespoons of recently brewed chicory coffee

Pinch of salt

Place all of the ingredients in a saucepan. Boil for 10 minutes on medium low heat, stirring occasionally. Keep an eye on the cream so it doesn’t boil over. Take off the heat and place in a blender and blend until smooth, adding more whipping cream if needed. The texture you are looking for is a smooth paste. The pecan cream should have grain but it should be spreadable. Keep chilled until ready to use.

Recipe: The Perfect Dutch Baby

Serves 2

Note: You can also make the batter ahead of time for a speedy breakfast. Just blend the ingredients together and stash the batter in the fridge overnight. Continue with the rest of the recipe as follows.

¼ cup of all-purpose flour

¼ cup of half-n-half

2 eggs

2 tablespoons of sugar

Splash of vanilla extract

Pinch of salt

1 tablespoon of unsalted butter, room temperature

Preheat oven to 425 degrees

Combine all of the ingredients with the exception of butter in a blender and blend until smooth. Set aside.

Once the oven has preheated, place the butter in a 10-inch skillet and place in the oven until all the butter has completely melted (this will only take a few mintues.) Take the skillet out of the oven and brush the melted butter up the sides of the skillet. Pour the batter into the buttered skillet and immediately return it to the oven. Bake for 15 minutes or until the edges are golden. Enjoy!


Categories
Breakfast

SAVORING SOUTHERN SNOW

Sourwood Honey Scones| for the love of the south

There is something enchanting about Southern snow. The bleak, russet landscape suddenly draped in winter white. As if under the spell of a soothing lullaby, the earth is still and quiet, tucked safely under a blanket of snow. And we, the lucky spectators, hold our breath, taking in this magical, rare moment.

A mix of snow and ice gently crunch and squeak under our boots as we venture out into our own little tundra. Michael dares to glide across a glassy puddle, completely frozen, or at least he thought so as the muddy pool began to give way to the weight of his body, shattering like thin brittle underfoot. I shrill, giggle and stomp my feet in vain, attempting to get warm. My entire face has become completely numb and delirium has possibly set in at this point. I wave down my adventurous husband and declare (only with my eyeballs mind you) that it’s time to go home.

Sourwood Honey Scones | for the love of the south

As I sit in the warmth of my loft, I begin thinking about how baking and Southern snow remind me of each other. Soft, white puffs of flour rise and fall as I cut out rounds of dough, which resembles the powdery snowflakes frolicking right outside my window.  A blanket of snow retells of the tender hue of buttermilk streaming over all living things, nourishing them. Then there is the sweet steam that wafts and waves from a freshly baked good, much like the steam that lifts from my lips in the icy cold air. Both wonderful. Both magical. Both have the ability to give great joy and warm the heart in its own way. And I rest here with my piping hot scones, savoring my sweet day spent in the Southern snow.

Scone Dough | for the love of the south

Recipe: Sourwood Honey Scones

Makes 9

Note: If you have made biscuits before, you can make scones. Scones are really a sweet biscuit if that helps! 

Whipping honey intensifies its floral taste. Just place the honey in a mixing bowl fitted with a whisk attachment and whisk on the highest speed for 10-15 minutes. If you don’t have time to whip the honey, you can certainly use honey straight out of the jar for this recipe.

Also, you can use two knives or a pastry cutter to cut the butter into the flour, but I enjoy using my hands and being able to feel the mixture coming together.

2 cups of all-purpose flour

1 tablespoon of baking powder

3/4 teaspoon of kosher salt

½ cup of granulated sugar

¾ cup of buttermilk, plus more for brushing

¼ cup of sourwood honey (or any other local honey), whipped (see note above)

4 tablespoons of unsalted butter, cold, cut into cubes

Preheat oven to 425 degrees.

Whisk flour, baking powder, salt and sugar together in a mixing bowl.

Whisk ¾ cup of buttermilk and honey together in a small bowl, just until the honey is incorporated into the buttermilk.

With your fingers rub the butter into the flour mixture until there are no pieces larger than the size of a pea remaining. Stir in the buttermilk and honey mixture with a wooden spoon just until combined.

Turn out the dough onto a lightly floured surface and create a rectangle with the dough with the narrow side facing you. Fold the dough in thirds onto itself. Rotate the dough and fold the dough into thirds again. These folds are creating lovely layers. Pat the dough evenly until the dough is about 1-inch thick. With a biscuit cutter (I use the top of a wide-mouthed Mason jar) cut 8 circles and freeform the last one with the scraps left over (chef’s treat!)

Place on a parchment lined baking sheet and brush the tops with more buttermilk. Bake for 10-15 minutes, or until the tops are golden brown. Enjoy!

Scone Dough | for the love of the south

Categories
Breakfast

GRANOLA CONVERT

Homemade Granola

Growing up, I never ate granola. Honestly, I had never tried granola until I moved to Texas in high school. Many people assumed it was all I ate because of my supersonic metabolism. In reality, I thought packaged granola tasted like tree bark.

One of my philosophies about food is I eat what I enjoy, not necessarily what’s healthy, just what tastes good. But being an environmental science student in college tested the bounds of my philosophy. For instance, while other departments chomped on Cheetos and Doritos, my department swapped yogurt clusters and granola. So being a polite non-conformist, I graciously yet hesitantly accepted any granola offered to me during class from my fellow classmates.

“Oh, so good,” I fibbed. I secretly contemplated spitting the granola out into the tiny black wastebasket in the corner of the room. I’ve never tasted mulch before, but I imagine it tastes like whatever I had just put in my mouth. I learned quickly though. When I noticed someone pulling out a dingy bag of granola, I quickly whipped out a box from my bag and said, “Prune, anyone?” No one ever asked me to try their granola again.

Recently, I started craving something nutty, spicy and quick to prepare in the mornings. So, I ventured into the misrepresented world of granola and discovered homemade granola. I stumbled upon this recipe adapted by Nigella Lawson and Molly Wizenburg, which I adapted once again to suit my palate. I’m a granola conformist and guess what? It tastes good.

Homemade Granola

Recipe: Adapted from Nigella Lawson & Orangette

Makes 10 cups

Note: You can substitute the corn syrup for golden syrup (on the sugar aisle), but if you do, decrease the amount of brown sugar to ¾ a cup. Also, for the applesauce, I used 2 natural applesauce pouches that you would put in a kid’s lunchbox. It’s the perfect amount for this recipe! One more thing, if you want to add dried fruit to the granola, you definitely can, just wait until the granola has come out of the oven then add in the dried fruit (I used dried cranberries the day I took these photos. I also love golden raisins!)

Dry Ingredients:

5 cups of rolled oats

2-3 cups of slivered almonds or pecan halves (or a mixture of both)

1 cup of hulled raw sunflower seeds

2 tablespoons of sesame seeds

1 cup of brown sugar

1 tablespoon of ground cinnamon

1 teaspoon of ground ginger

1 teaspoon of salt

Wet Ingredients:

¾ cup of unsweetened applesauce

1/3 cup of corn syrup

¼ cup of honey

2 tablespoons of vegetable oil

Make sure oven racks are in the upper and lower thirds of the oven. Preheat oven to 300 degrees.

In a large bowl, combine all of the dry ingredients. Mix well. In a small bowl, whisk all of the wet ingredients together. Pour the wet ingredients over the dry ingredients and stir well.

Spread the mixture evenly between 2-rimmed baking sheets. Bake for 35-40 minutes, or until evenly golden brown. Set a timer to go off every 10 minutes while the granola is baking to rotate the baking sheets and stir the granola (I set 2 timers, one for 35-40 minutes and another for 10 minute intervals to help me keep track of the timing!) Whenever the granola is golden, take the baking pans out of the oven and stir the granola well so that the granola doesn’t cool in one large, solid sheet. The granola will seem soft when it comes out of the oven, but it crisps as it cools.

Place the cooled granola into a large Ziploc plastic bag or another airtight container, and store in the fridge until ready to consume!

Homemade Granola

Categories
Breakfast

RISE AND SHINE

Griddle Cakes

Morning time. This is the time of day which is most inspiring as it reminds me of a blessing of a new day as the sun helps me unravel from under my fluffy comforter and the promise of coffee coaxes me even more. There is a stillness about the morning, a quietness that often gets lost on the rest of the day. A moment where a cup of coffee is enjoyed, reflections are pinned in a journal, and the only sound that is allowed to disturb the calm of the house, is the sizzle of batter hitting a piping hot cast-iron skillet, which acts as the sweetest alarm to anyone else still dreaming. Lazy bones gather at the kitchen table, as griddlecakes are rapidly drowned in syrup and butter and disappear within mere seconds. And in the one moment of pure bliss and contentment, breathe deeply and know it will be a good day. It’s already a good morning.

“For each new morning with its light, for rest and shelter of the night, for health and food, for love and friends, for everything thy goodness sends.”- Ralph Waldo Emerson

Recipe: Adapted from Blackberry Farms

6 Servings

1 large egg

2 cups of buttermilk

¼ cup of local honey

¾ cup of yellow cornmeal

1 ½ cup of all-purpose flour

1 tablespoon of baking powder

1 teaspoon of baking soda

1 teaspoon of kosher salt

¼ cup (½ stick) of butter, melted

Vegetable oil (for cast-iron skillet)

Whisk egg, buttermilk, and honey in a small bowl.

Whisk the cornmeal, flour, baking powder, baking soda, and salt in a large bowl.

Whisk the buttermilk mixture into the dry ingredients, then whisk in the butter until there are no lumps in the batter.

Heat a large nonstick pan or cast-iron skillet over medium heat, lightly brushing with vegetable oil (whenever I use a nonstick pan, no added grease is necessary for the griddle but do a tester griddlecake to see if the cake sticks to the pan or not.)

Working in batches, pour prepared batter by the ¼ – cupful into the skillet. Cook until the edges brown and bubbles form on top. Flip griddlecakes and cook until the cakes are completely cooked through. Serve with syrup and butter (or more honey!)