Categories
Side Dishes Uncategorized Vegetables

WINTER’S WHITE GOLD

Buttery Braised Belgian Endive | for the love of the south

Like an anxious child, I start tearing through kitchen boxes that have been stored up for months. In the matter of moments, my winter white kitchen begins taking on a life of its own as copper and silver trays, amber glass bottles filled with spices and salts, countless mason jars, slicked cast-iron skillets, brass pots and nicked wood cutting boards settle into their proper places. The kitchen is set up just in time as a blizzard is forecasted to barrel through Nashville. Whenever you live in the South and snowfall is predicted, you equip yourself with essentials, which usually come in the form of bread and milk. In a storm one thing is certain, we must eat.

Belgian Endive | for the love of the south

Slowly but surely, the dust begins to settle as I relax into a home we have been renovating for the past six months. Michael and I left the loft in Franklin and purchased a lovely fixer upper in the heart of Nashville. The house has been stripped down to the studs, and, finally, after many months of blood, sweat and tears, it’s beginning to feel like a home.

Purple Garlic | for the love of the south

The first click-click-click of the gas range seems to blow away any cobwebs. Armed with a beloved and dearly missed knife, I begin ripping through the centers of crisp white and pale green Belgian endive, also known as winter’s white gold. Deep green rosemary sprigs and pink papery jackets from purple garlic litter my table. Pulling out my cast-iron skillet is like reuniting with an old, loyal friend. No matter how much time has passed between the two of you, it’s like no time has passed at all. The endive starts to char in the skillet, and the bitter, crisp leaves sweeten and soften like silk petals. Lentil soup already at hand simmers away in a small copper pot on the back burner. In less than thirty minutes, I enjoy my first meal in my snow covered home.

Braised Belgian Endive | for the love of the south

Buttery braised Belgian endives pair beautifully with comforting, familiar lentil soup. This is purely a vegetarian dish, yet the endives take on a “meaty” quality with help from the rosemary and garlic. Spoon a little of the leftover cream from the endives into the lentil soup, which adds richness, decadence and also ties the two dishes together wonderfully. If by chance you have any leftover endive, toss in an omelet or with pasta. You could also create another soup with the endive by sweating onions, garlic and braised endive in a pot, add stock, season, and simmer for twenty minutes. This is what I call home cooking: Picking up loose ends from one dish and tying them together with the next, forming an everlasting meal.

Buttery Braised Belgian Endive | for the love of the south

This post was created in sponsorship with Food 52 & Progresso. All thoughts and opinions belong to me!

Buttery Braised Belgian Endive:

Serves 4

4 Belgian endive

3 tablespoons unsalted butter

¾ cup heavy whipping cream

1 garlic clove, thinly sliced

2 rosemary sprigs

2 teaspoons lemon juice

Sea salt and black pepper, to season

Preheat oven to 400oF

Trim the ends of the endive and remove any discolored outer leaves. Cut in half lengthwise, and season the cut side of the endive lightly with sea salt.

Melt butter in a large cast-iron skillet over medium heat. Add the endive, cut side down, and cook until golden, 2-5 minutes. Place the endive, browned sides up in a large, shallow baking dish. Add cream, garlic, and rosemary sprigs to the dish. Season lightly with sea salt and freshly cracked black pepper. Cover tightly with foil and bake for 20 minutes, or until the endive are tender. Drizzle with lemon juice and serve.

img_6852

Categories
Vegetables

THE ENCHANTED CUCUMBER PATCH

Cucumber Ribbon Salad | for the love of the south

A Southerner’s backyard is a treasure trove of edible gems during the long, hot summer months. Standing in the yard, I gaze from left to right, each neighbor has a little garden of some sort, revealing characteristics of its caretaker. Some gardens overflow with herbs and spring onions in simple clay pots, others with emerald green bell pepper plants in perfectly straight rows. The more adventurous gardeners have a few chickens strutting about their yard, feasting away on herbs and fallen vegetables. Then, there are those who create raised vegetable beds out of old barbecue pits and tractor tires.

I remember tending to our own little garden with my mom when I was a little girl. One night, I sat in the dirt next to the cucumber plants as we began snipping away at a few green onions for our dinner. I couldn’t help but stare at the perfectly ripe cucumbers suspended in midair, reminding me of hanging sausages in a great meat market. I peer under one of the jade leaves and spotted a small cucumber with a bright yellow flower attached at one end. A crack of thunder in the distance broke my focus. Tomato plants sway in the breeze and drops of cool summer rain began hitting our cheeks. “Be sure to peek at this one in the morning,” mom said with a knowing smile. Before it began pouring, we rush inside with fists full of green onions and arms crammed with cucumbers. I thought no more of the gherkin-sized cucumber and continued helping to prepare for dinner as it rained sheets and sheets.

Cucumber Ribbons | for the love of the south

The next morning, I walk outside to gather a few tomatoes and herbs for breakfast. Curiosity gets the best of me as I begin folding back the leaf, and lo and behold, the teeny cucumber grew half the length of my forearm overnight. I couldn’t believe it! From that moment on, I thought of cucumbers as being enchanted. They appear mystically in our garden patch after a midsummer storm and disappear just as magically at our table.

Cucumber Ribbon Salad

Serves 2

Note: This is a delicate, quick summer salad, which pays homage to the simple way we prepared cucumbers growing up. There is no need to make this recipe ahead of time, just wait until the last minute to toss the cucumbers in the dressing, or else you will end up with waterlogged cucumbers instead of crunchy, fresh ribbons.

½ medium-sized garlic clove (or 1 small garlic clove)

Pinch red pepper flakes

Small handful mint, leaves only, plus more for serving

2 tablespoons lemon juice

4 tablespoons extra virgin olive oil

1 medium-sized cucumber

Parmesan cheese shavings, for serving

Sea salt and black pepper, to taste

Finely chop the garlic clove, red pepper flakes and mint leaves together. Place the seasonings in a medium-sized mixing bowl and add the lemon juice. Whisk in olive oil and season with salt and pepper to taste. Set aside.

With a vegetable peeler or a mandoline, thinly slice the cucumber. Once you get to the seeds, begin cutting the other three sides, so all you are left with is the watery, seedy center.

Discard the seedy center and toss the cucumber ribbons in the dressing. Once all of the ribbons are coated, lay the cucumbers on a serving platter. Scatter with remaining mint leaves, Parmesan shavings and black pepper. Serve immediately.

Cucumber Ribbon Salad | for the love of the south

Categories
Entrees Vegetables

A BUGGY WITH A VIEW + A LODGE CAST IRON GIVEAWAY

Roasted Nashville Hot Chicken | for the love of the south

Whenever I was a little girl, many afternoons were spent gathering ingredients for our family dinners with my mom at our local grocery store in Lake Charles, Louisiana. The old, shuddering sliding glass doors warmly welcomed us. We made our way across the scuffed black and white checkered floor; my mom grabbed a shopping cart, also referred to as a buggy in the South. The buggies at our grocery store were unique; the area for groceries was shallow instead of deep like baskets nowadays. The end of the cart had a latch, so whenever you went to checkout, the checkout girl simply unlatched the end of the basket, like a truck bed and unloaded the groceries straight from the cart. But the most important thing to know about these buggies is that the distance between the bottom of the basket and the rack just above the wheels of the cart was an ideal space for a child to retreat to.

As soon as I nestled underneath the buggy, my mom made her routine stop to the deli counter to buy a pickle. She covertly handed it to me, going along with the charade that I was invisible to everyone else in the store except her. Now that I think about it, everyone probably thought I was a little odd as I had one leg propped up and the other leisurely dangling in midair as if I were floating on a pirogue in the bayou while slowly munching away on a pickle.

Louisiana Maque Choux | for the love of the south

I enjoyed watching the cart fill up with ingredients for our supper. Emerald striped watermelons the size of a toddlers, dusty, earthy cantaloupes, bags and bags of long-grain rice, Mason jars of roux, pint-sized containers of cayenne pepper and ruby red homegrown tomatoes rolled around in the basket. I daydreamed about what we were having for dinner and quietly observed the other shoppers in the store, imagining what they were making for dinner as well. Sometimes I dreamt of what it would be like if everyone put all their groceries together on one endlessly long picnic table and had a great feast every night. I decided that would certainly establish world peace.

Things weren’t always seen for what they were, but what I imagined they could be. As a child, I was oblivious to the fact that not everyone saw the world the same as I did. And as I grew up, I realized I tasted the world around me differently as well.

Nashville Hot Chicken:

One of my favorite Southern dishes is fried chicken, so whenever I moved to Nashville, immediately I was introduced to Nashville’s cayenne crusted hot chicken, which has been known to make grown men weep. Traditionally, hot chicken is fried in a cast-iron skillet and crusted with a reddish cayenne paste, and is served with pickles and white bread, which gets soaked through with shockingly spicy orange hot chicken drippings. I love serving my spicy Roasted Nashville Hot Chicken with sweet Louisiana Maque Choux because it ties together two homes. My past and my present. Here’s to the hot summer days ahead.

{Because I love y’all, I am giving away a 15” Seasoned Steel Pan from Lodge Cast Iron. To enter the giveaway, leave a comment below letting me know your favorite dish to prepare in your cast-iron between now and midnight June 4th. The winner will be chosen randomly and will be contacted via email on June 5th. Limit 1 comment per person, pretty please! PS For US residents only… Good luck, y’all!} Congrats to Sandy for being the winner of the giveaway!

Roasted Nashville Hot Chicken

Serves 4

Note: Traditionally, Nashville Hot Chicken is fried then tossed in a hot chicken paste. I prefer the method of pan-frying then finishing the thighs off in the oven. The result is crispy skin and juicy dark meat, and while the chicken finishes off in the oven, I have time to clean up the kitchen and get ready for company!

8 bone-in, skin-on chicken thighs

2 tablespoons of olive oil

6 tablespoons of clarified butter, melted (or you can use olive oil if you prefer)

5 tablespoons cayenne pepper

2 teaspoons of dark brown sugar

2 teaspoons of kosher salt

2 teaspoons of sweet, smoked paprika

Salt and pepper, to season

Preheat oven to 425oF

Taking a paper towel, gently blot the chicken thighs, making sure to remove any moisture from the surface of the chicken. This will ensure you get a nice crisp golden skin. Season both sides with salt and pepper.

In a large pan over medium high heat, preferably cast-iron or seasoned steel, heat the oil until it shimmers. Gently place the chicken thighs in the pan skin side down and fry until the skin is lightly golden brown. Flip the thighs over and immediately place the pan in the oven for 25-30 minutes or until the thighs are completely cooked through and deeply golden brown.

Combine clarified butter (or oil, if using), cayenne pepper, dark brown sugar, 2 teaspoons of kosher salt, and paprika in a medium-sized mixing bowl. This creates the Hot Chicken Paste. While the chicken is still piping hot, gently coat the chicken in the Hot Chicken Paste. Serve with pickles and white bread for an authentic Nashville Hot Chicken experience or serve with Maque Choux!


Maque Choux

Serves 4

2 rashers of bacon

1 small onion, minced

1 Serrano pepper, deseeded and deveined, minced

1½ teaspoon of kosher salt

½ teaspoon of black pepper

½ teaspoon of sweet, smoked paprika

Pinch of red pepper flakes

2 medium-sized tomatoes, diced

3 garlic cloves, minced

1½ cups of water

6 ears of corn, kernels cut off the cob

Small handful of basil leaves

In a cast-iron skillet over medium high heat, cook bacon until crispy and golden brown. Remove the bacon from the skillet, drain on a paper towel and crumble. Add onion, Serrano pepper, salt, black pepper, paprika and red pepper flakes to the bacon drippings. Sauté for 5 minutes. Add tomatoes, garlic and water. Reduce heat to simmer for 10 minutes. Add corn and simmer for another 10-15 minutes until the corn is cooked through. Take off the heat. Stir in the basil leaves and crumbled bacon. Adjust seasoning to taste.

Roasted Hot Chicken + Maque Choux | for the love of the south

Categories
Uncategorized Vegetables

THE ART OF PRESERVING

The Art of Preserving | for the love of the south

Every year, I find myself trying to cling onto the last days of summer. By this point, many Southerners are beyond ready for cooler temperatures and shorter days, which I do love. But there is something about summer I wish I could bottle up: flickering fireflies, warm summer nights, and most of all, its produce. I happily endure the heat to devour juicy, ripe tomatoes, peppery okra pods, blushing peaches and beautiful blackberries.

The art of preserving is like a palimpsest, something that has been traced onto the pages of generations before us. With each page, the lines grow fainter and fainter until one day it may completely disappear. So, in pure desperation of holding onto the last days of summer and the art of preserving, I tied my linen apron strings and got to work.

Fresh Tomatoes | for the love of the south

I gathered all of the essentials: clean jars, fresh basil, a pot of boiling water, and a crate full of ripe summer tomatoes, anxiously awaiting their moment to be sealed in a mason jar and put away for the chilly months to come. Standing there in my steamy kitchen, with one hand on my hip and the other fishing out jars of sealed tomatoes with my bare fingertips, which I do not recommend, I instantly felt connected with the wonderful women with worn, wrinkled hands that have perfected the art of preserving generations long ago. There is something romantic and beautiful about preserving; in taking something we have in abundance today and saving it for sparse times in the future. The art of preserving is like an act of faith.

This goes beyond preserving tomatoes; this is a ritual to pass to the next generation in hopes of preserving part of our culture and forever clinging to the flavor of summer in the South.

The Art of Preserving | for the love of the south

Canned Tomatoes:

There isn’t a recipe to go along with this post, but I will give you a few steps for canning tomatoes that I found helpful.

P.S. Make sure you carefully inspect your jars, lids and rings before using. If you notice any rust, dents or chips, don’t use them for canning, please! Also just as a reference, I bought a 25-pound crate of tomatoes and canned 20, 16 ounce wide-mouth jars.

Wash your jars, rings and lids with warm, soapy water and dry completely. Place the jars, rings, and lids onto a baking sheet, making sure the pieces are spaced out and not touching. Place the baking sheet into a 225oF oven for at least 10 minutes. If you keep them in longer, that’s fine, but allow them to stay in for at least 10 minutes, undisturbed.

Cut an “x” on the bottom of each tomato and blanch them in a bowl of recently boiled water. Allow them to sit in the hot water for 5-10 minutes, or until the skin comes off with ease.

Peel the tomatoes, cut the core out and slice in half, lengthwise. (If you are canning larger tomatoes, cut into quarters.)

Whenever you are ready to fill the jars, take the baking sheet out of the oven and fill the jars with the peeled and cut tomatoes, placing a fresh basil leaf into each jar. Gently press the tomatoes down, and drain any excess liquid that comes up to the top. Pressing on the tomatoes does two things: you are making sure you are filling all of the space in the jar, and you are getting rid of excess water from the tomatoes. The result: you end up with actual tomatoes in the jar, not just a few tomatoes and tomato water! After you drain the liquid, fill the jar with more tomatoes until the jars are completely filled. With a clean towel, wipe any excess juice or pieces of tomato from the top of the jar.

Carefully place the lid onto the jar, making sure you do not touch the bottom of the lid. Screw the lid on tightly. Place the jars in a large stockpot, filling the pot with water so that your jars are covered at least halfway. Place a lid on the pot and allow the water to come to a boil. Once the water begins to boil, set a timer for 15 minutes. After 15 minutes, carefully take the jars out of the boiling water, tighten the lid more if you can, and set the jars aside to cool completely. Make sure you check the seal by pressing down on the top of each lid. If the lid doesn’t budge, great job! Store in a dark, cool pantry. But if the lid pops back, place the jar in the fridge and use a.s.a.p.


Categories
Vegetables

4TH of JULY + SOUTHERN RATATOUILLE

Southern Ratatouille | for the love of the south

There is something so freeing about this time of year. The weight of the world seems to slip off our shoulders and allows us to dive deep into the pleasures of the summer sun. Farmers markets are filled with the most beautiful, vibrant colors. Feasts are prepared ahead of time, allowing us more time to spend out of the kitchen and outside with loved ones.

Summer Produce | for the love of the south

Last week, I was completely captivated by the summer produce at the market. White and purple speckled eggplant, pinky-sized emerald okra pods and intensely dark zucchini caught my eye. Immediately, I knew I wanted to make ratatouille, and not just any ratatouille, Southern Ratatouille. I tossed in okra along with the other lovely summer vegetables, added a lot of red pepper flakes, omitted the Herbs de Provence and finished the dish with a few shakes of Tabasco sauce. The best thing about ratatouille is that it gets better as it sits in the fridge, so it’s the perfect dish to make ahead of time and can be served warm, cold or at room temperature, which made it the most wonderful dish for a picnic I was having the next day.

Summer Produce | for the love of the south

I drove along the long, dusty road to Arrington Vineyards to meet up with a dear friend. We found a quiet, shaded spot at the top of the vineyard and laid out our spread. She prepared a simple mozzarella and tomato salad and a beautiful cherry galette. I whipped out my ratatouille, a freshly baked baguette, fleur de sel oregano butter and fresh lemonade. We chatted all day about the summer, our plans for the 4th of July and mostly just laughed until the sun began to set and we went our separate ways.

Summer Picnic | for the love of the south

On the way home, I began dreaming about my 4th of July menu while still buzzing over our picnic in the vineyards. I decided to make a peach and basil galette, sweetened with raw honey, stone fruit summer sangria, vanilla ice cream served with fresh berries and sea salt caramels.

Peaches + Basil | for the love of the south

The air was unseasonably cool as the sun began to set on the 4th of July. Our linen draped table proudly held our summer creations. Close friends gathered together. Laughter and fireflies filled the air. And, then there were fireworks.

Now, let me explain. About half of the gathering consisted of Australians, and in Australia, it’s illegal to pop fireworks. Therefore, the overall response to the fireworks was unbelievable! I was more entertained by their squeals and wide eyes than the actual explosives. My crème brûlée torch, which I set out for toasting marshmallows, was being slightly abused as it was being used to light the fuse for the fireworks. All of a sudden, one of the rockets fell over and completely bombed us! The children spent the rest of the evening underneath the table in sheer terror and were seemingly forming an evacuation plan in case of an emergency (There may have been a few adults hiding under there as well.)

Summer Stone Fruit Sangria | for the love of the south

Toward the end of the evening, I began pecking away at the drunken fruit in the bottom of my sangria jar as the smoke from the fireworks cleared, I sat back and relaxed as the fireflies flickered away in the distance and the laughter of our group softly bubbled away like a gently simmering pot of blackberry jam. I felt the weight of the world fall off my shoulders in the freedom of the setting summer sun on this wonderful 4th of July.

4th of July Evening | for the love of the south

Recipe: Southern Ratatouille

Inspired by Buvette

Serves 4

Note: This has become my favorite ratatouille recipe because of its simplicity and ease. It’s a wonderful summertime recipe that be served warm, cold or at room temperature. My favorite way to eat ratatouille is on a heavily buttered baguette finished with a sprinkling of fleur de sel.

2 tablespoons of unsalted butter

2 tablespoons of extra virgin olive oil

1 small yellow onion, finely diced

2 small tomatoes, cut into ½ -inch dice

1 red bell pepper, cut into ½ -inch dice

2 garlic cloves, minced

1 medium-sized eggplant, cut into ½ -inch dice

Handful of okra pods, trimmed and cut into small rounds

1 zucchini, trimmed and cut into ½ -inch dice

1 teaspoon of red pepper flakes

3 teaspoons of Tabasco Green Jalapeño Pepper Sauce

Sea salt, to taste


Place the butter and olive oil in large, heavy pot over medium heat. Add the onion, tomatoes, bell pepper and garlic, and a pinch of salt. Cook, stirring occasionally until the vegetables soften, about 10 minutes. Add the eggplant and okra rounds and another pinch of salt and cook for another 10 minutes. Lastly, add the zucchini and the red pepper flakes. Stir and cook for a final 15 minutes (35 minutes total), or until all of the vegetables are soft. If the mixture begins to look a little dry, add 1 tablespoon of olive oil. Take off the heat and stir in the Tabasco Green Pepper Sauce and add more salt if needed.

Ratatouille can be made ahead and will last up to a week in the refrigerator.


Recipe: Summer Stone Fruit Sangria

Serves 15-20

Combine 3 (750ml) bottles of dry white wine, ½ cup of brandy, 1 pound of sliced peaches and 1 pound of pitted cherries in a large container and chill overnight. Right before serving, add a liter of sparking water to the sangria. Enjoy!


Categories
Appetizer Vegetables

OKRA WHEN IT SIZZLES

Smashed Cayenne + Cornmeal Crusted Fried Okra | for the love of the south

Sometimes sweet summer pleasures come early in the South. As Michael and I walked toward our local farmers market last week, Michael looked at me and said, “Maybe they will have okra!” I sweetly stated it was probably too early in the season for okra. Honestly, I didn’t want to be disappointed but secretly hoped there would be some too.

Fresh Okra | for the love of the south

As we got closer to the market, the first thing to catch my eye was a wooden crate filled to the brim with pinky-sized okra pods. My heart skipped a beat. The first okra of the season! I quickly grabbed a bag and began picking through the precious pods. Almost immediately my hands started to sting a little. The lady tending the market noticed I began itching the back of my hands. “It’s from the okra, isn’t it?” I nodded that indeed it was, but this little bother was about to be well worth it.

Fried Okra Ingredients | for the love of the south

Whenever I returned home, I laid the emerald beauties on white marble and gently began smashing the ends of the okra with a wooden pestle. As soon as I inhaled the grassy scent of fresh okra and listened to the symphony of sizzle as the cornmeal batter hit the hot oil, I knew I was right. In life, the good far outweighs the bad, and in the end, there’s fried okra.

Smashed Okra | for the love of the south

There are some ingredients that beg to be transfigured and transformed like a strawberry pleading to be roasted and paired with a drizzle of balsamic vinegar or sweet white corn steeped in cream, creating a lovely base for a summertime ice cream. But then there are those ingredients I can’t help but prepare the same way, time after time. I have yet to find a more comforting use of okra as being bathed in buttermilk and tossed in cayenne and cornmeal and quickly fried. I believe frying okra is the way nature intended it to be prepared. Why else would it endure and thrive in the Southern summer so much if it didn’t love to sizzle?

Cornmeal Crusted Smashed Okra | for the love of the south

Recipe: Smashed Cayenne + Cornmeal Crusted Fried Okra

Adapted from Southern Living | June 2014

Makes 4-6 Servings

Note: The original recipe leaves the entire okra pod whole, without cutting off the tops. Personally, I eat the pod whole, but after serving these whole, I found the fried tops left on the platter. So, I decided to take that extra step and cut the tops off since most people don’t like eating the entire pod, but it’s completely optional!

1 pound of fresh okra, washed and dried

1 ½ cups of buttermilk

2 cups of fine yellow cornmeal

½ teaspoon of cayenne pepper

Kosher salt and freshly ground black pepper

Canola oil, for frying

Using a flat kitchen utensil like a pestle, meat mallet or even the bottom of a Mason jar, gently smash the okra, starting at the fattest part of the pod, working your way down to the skinny tip of the pod.

Optional Step (see note): Once the pods are smashed, cut off the woody top (or the “head”) of the okra pod. (I acted like the Queen of Hearts from Alice in Wonderland yelling, “Off with your head,” at this step to keep myself entertained, you may do the same!)

Place the buttermilk in a shallow dish, and place the cornmeal and cayenne pepper in another shallow dish. Season both the cornmeal and buttermilk with desired amount of salt and pepper.

Dip the smashed okra into the buttermilk and dredge in the cornmeal, shaking off the excess.

Pour oil to a depth of 2-inches in a large cast-iron skillet. Heat to 350o. Fry the okra in batches, 2-3 minutes or until golden and crispy, turning once. Remove the okra and drain on paper towels and season lightly with kosher salt. Devour immediately!

Smashed Cayenne + Cornmeal Crusted Fried Okra | for the love of the south


Categories
Vegetables

THE PERFECT ROAST POTATOES

The Perfect Roast PotatoesRight down the street from where I lived was a tiny, taupe elementary school sweetly nestled next to a convenience store and a beloved grocery store. Tucked in between the worn hurricane fence and the textured brick façade of the school was a small, modest plot of dirt where Mrs. Benoit’s 2nd grade class were to conduct very important physical science experiments.

The entire group marched outside onto the magically damp, dark chocolate lot. We fashioned furrows with our hands, gently created holes with our index fingers and dropped tiny seeds into the hollows. We covered them with mossy, murky soil, gave them a drink and hoped they slept tight under the soil and not to let the bedbugs bite.

The Perfect Roast PotatoesDaily during recess, I took a quick peak at the petite garden. My heart filled with delight as I began seeing little sprigs of green hairs and emerald leaves peaking through the soil and stretching out in the sunlight like a small child awakening after a midafternoon nap.

Then, on one bright and sunny day, Mrs. Benoit told us to retreat to our adored garden we had been tending to for quite some time now. She handed out little shovels and gardening gloves and directed us on how to tend each row of veggies. I was assigned to a short row of mysterious emerald fronds while the rest began plucking beautiful vibrant green cucumbers and juicy red tomatoes off their vines. Immediately, I became chartreuse with envy but quickly shrugged it off and stayed on task.

The Perfect Roast Potatoes Rising to the challenge, I lowered my shovel, confronted the bright green shrub and gave it a good yank. All of a sudden with a zip I flew onto my back, holding what seemed like a clump of mud. Desperately, I shook myself off trying to clean the dirt from my clothes without attracting too much attention to myself. Then, I stared at my fist and gasped. I ran over to Mrs. Benoit screaming, “ I think I just harvested turtle eggs!” She just laughed and said, “Honey, those are potatoes.” My eyes became as big as golf balls in sheer disbelief. I never looked at a potato the same way ever again.

This is the best roast potato recipe ever. These little beauties are quite addictive, and they will disappear in mere moments. Breaking through these perfectly roasted potatoes, listening to the cartoon crunch, inhaling its meaty aromatics and allowing the creamy, fluffy insides of the potato fall on your tongue like warm, buttery clouds, makes every second spent cooking them, tending to them, worthwhile. Enjoy!

The Perfect Roast PotatoesRecipe: The Perfect Roast Potatoes

Inspired by Jamie Oliver

Serves 4 as a side

Note: Parboiling the potatoes, adding them to hot fat and slightly crushing them after they have cooked ¾ of the way, helps create a fluffy, insanely crunchy roast potato. Also, you can substitute clarified butter or duck fat for the olive oil for a less healthy option. I won’t tell!

1 bulb of garlic

3 sprigs of rosemary

1- 1 ½ pounds of baby potatoes, peeled

Olive oil

Sea salt

Preheat oven to 400 degrees

Crush the bulb of garlic, leaving the cloves in their paper jackets and pluck the leaves off of the rosemary sprigs.

Place the potatoes into a pot of cold water, covering the potatoes by about 1-inch. Season the water with salt and boil for about 5 minutes. Drain and allow them to steam dry for a few minutes. Then, shake the colander until the potatoes start to look fuzzy and blurred around the edges. This step will help create a crunchy roast potato!

Place a skillet on medium-high heat (or place in the preheated oven until hot) and add enough olive oil to coat the bottom of the pan. Toss in the garlic cloves, rosemary leaves and potatoes and place in the preheated oven for 30 minutes. After 30 minutes, take the skillet out of the oven, gently flip the potatoes and smash them slightly with the back of a fork. Place them back in the oven for 30 more minutes, or until the edges are crispy and golden brown. Serve immediately.

Categories
Vegetables

PRESERVING SUMMER

Canning Jars | for the love of the south

August is the month of endless summer days, which is inevitably coming to a close.  It should fly by, like all good things do, but August seems to stick with me. It stews and simmers and permeates the air, like the smell of something that has been cooking away for hours on the stove, reaching every nook and cranny of my memory. Every part of me wishes I could bottle up the elation of catching fireflies, the rush of wind on my face as I sway ferociously on a tire swing, and the tiny squeal I still make whenever I catch a fish. I would put them on a shelf to enjoy all year long, if only that were possible. Perhaps I need to look elsewhere to preserve my blessed summer.

Habanero Pickled Watermelon Rind | for the love of the south

So, with the need for stability and encouragement in life, I find my way to the kitchen, securely tie my apron strings and get to work in upholding summer my way. And by that, I mean canning (or “puttin’ up” as we say in the South) but without using the traditional canning methods. I want a quick, spicy pickle that has been marinated in gloriously gleaming oil with fresh herbs.

Within moments into the pickling process, the air is sour with the hum of vinegar so thick that it permeates every nook and cranny of my home. And so it should, I am preserving August after all.

Green Jalapeño Pickled & Marinated Okra | for the love of the south

Recipe: Makes 1 Quart of Tabasco Habanero Quick Pickled & Marinated Watermelon Rind

Note: Pickling watermelon rind in habanero sauce brings out this amazing smoky and sweet combination that is heavenly. Now, you can half the amount of habanero sauce in the recipe if you want a more mild heat. Also, I sterilize my Mason jars in the dishwasher on a high heat setting. Just don’t touch the inside of the jar or the lid after they come out the dishwasher and desterilize the jars!

After you have placed a lid on the pickled rind and placed them in the fridge, the oil from the marinade will solidify slightly. That is completely fine. Just place the jar on the counter and let it come to room temperature before digging in!

For the pickling marinade:

1 cup of canola oil

1 tablespoon of fresh mint leaves

For the pickling liquid:

2 cups of water

1 ½ cups of red wine vinegar

1 teaspoon of salt

½ cup of Habanero Tabasco Sauce (or ¼ cup if you aren’t feeling so bold)

2 cups of loosely packed watermelon rind, cut into 2” long and ½” thick spears

Combine canola oil and mint leaves in a large mixing bowl. Set aside.

Place water, vinegar, salt and habanero sauce in a small saucepan and bring to a boil. Add the watermelon rind and boil in the pickling liquid for 3 minutes.

Using a slotted spoon, lift the watermelon rind out of the pickling liquid and transfer into the marinating liquid (don’t completely drain the rind, allow some of the pickling liquid to go into the marinade as well.) Immediately, transfer the watermelon rind and marinating liquid to a sterilized Mason jar, tightly stacking the pickled rind into the jar. Make sure the liquid covers the rind and screw the lid on tightly. Set aside to cool and place in the fridge. The pickled rind will last for a week stored in the fridge, or you can eat them immediately!

Makes 1 Quart of Tabasco Green Jalapeño Pickled & Marinated Okra

Note: The peppery notes in the Tabasco Green Jalapeño sauce compliments the grassy notes of the okra in a lovely, subtle way. Also, I sterilize my Mason jars in the dishwasher on a high heat setting. Just don’t touch the inside of the jar or the lid after they come out the dishwasher and desterilize the jars!

After you have placed a lid on the okra and placed them in the fridge, the oil from the marinade will solidify slightly. That is completely fine. Just place the jar on the counter and let it come to room temperature before digging in!

For the pickling marinade:

1 cup olive oil

3 cloves of garlic, sliced

Pinch of red pepper flakes

For the pickling liquid:

2 cups of water

1 ½ cups of vinegar (white wine, cider or rice vinegar will do)

1 ½ teaspoons of salt

½ cup Tabasco Green Jalapeño Sauce

2 cups of loosely packed okra, washed

Combine olive oil, garlic and red pepper flakes in a large mixing bowl. Set aside.

Place water, vinegar, salt and green jalapeño sauce in a small saucepan and bring to a boil. Add the okra and boil in the pickling liquid for 3 minutes.

Using a slotted spoon, lift the okra out of the pickling liquid and transfer into the marinating liquid (don’t completely drain the okra, allow some of the pickling liquid to go into the marinade as well.) Immediately, transfer the okra and marinating liquid to a sterilized Mason jar, tightly stacking the pickled okra into the jar. Make sure the liquid covers the okra and screw the lid on tightly. Set aside to cool and place in the fridge. The pickled okra will last for a week stored in the fridge, or you can eat them immediately!

Categories
Vegetables

AUGUST MORNINGS & OKRA

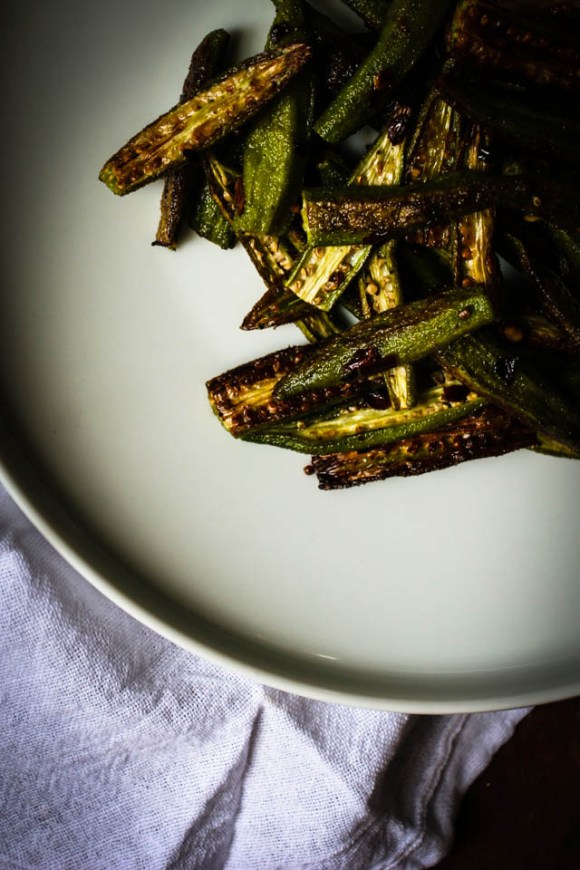
Roasted Okra | for the love of the south

Early August mornings began with a short jaunt to my grandma’s small garden patch. I remember walking barefoot in the grass and the feeling of the cool emerald blades, still clinging to the morning dew for dear life. Crawfish holes were speckled throughout my path, and I desperately attempted not to trample on them. The residents were allowed just a few more hours of peace and quiet before I began terrorizing the poor crustaceans. The gentle buzzing of wasp wings beat as familiar as an old truck puttering along a country road. My eyes finally spot the garden, tenderly tucked away in the corner of the yard.

Fresh Okra | for the love of the south

A sheltering fig tree filled the patch with a pleasant honeyed-aroma. Blackberries hid under their leaves like treasures waiting to be discovered, and sunny yellow flowers beamed at me with ruby eyes from the towering okra stalks. Jade ladylike fingers slowly swayed back and forth in the breeze, quietly summoning me like a queen giving consent to approach her throne. Peppery, grassy scents filled the air as I clicked a pinky-sized okra off its resting place, tossed it into a bucket and quickly filled the container to the brim with these emerald jewels. I followed the trail back to the house with the energy from the sun’s rays beaming on my back, a pail full of okra nestled in my arms, and the promise of a lovely summer’s day.

Recipe: Serves 4

Note: Cutting the okra in half lengthwise and roasting it eradicates the “slimy” texture that most people associate with okra. Also, try buying okra no longer than the length of your pinky. The smaller ones are delicate and tend to be more flavorful.   

1 pound of fresh okra, rinsed and dried thoroughly

½ teaspoon of salt

¼ teaspoon of freshly ground black pepper

½ teaspoon of red pepper flakes (or 1 full teaspoon for the bold)

¼ cup olive oil

Preheat the oven to 400 degrees

Trim the rough tops and skinny bottom tips off the okra pods, and cut the okra in half lengthwise. In a large bowl, toss the okra, salt, pepper, red pepper flakes, and olive oil together until well combined. On a rimmed baking sheet, spread the okra in a single layer and roast in the oven for about 15-20 minutes or until brown. Serve immediately.


Categories
Vegetables

SUNDAY AT DOMENICA

Roasted Cauliflower with Cheese Spread

On our honeymoon, my brand-new husband and I crossed the threshold of Domenica’s in New Orleans at around 5:00 p.m. To our surprise there was already a 3 hour wait for walk-ins. So, reservation-less and with the subtle glow of fainting newlyweds, we began stalking the tiny bar, which was tucked away in the corner of the restaurant. After a few moments of pathetic low-blood sugar stares, we finally nabbed 2 seats at the bar. Shameless success.

We made it clear we were here for the pizza as Domenica boasted some of the best in town. We ordered 2 full-sized pizzas, one with meat for the carnivorous male and one white pizza for myself. I felt content with our selection until I saw something roaming around the restaurant that caught my eye.  From a distance, the dish looked like a large, charred, textured…ball? As the plate got closer and closer I realized it was cauliflower. Cauliflower. Whole roasted cauliflower served with a creamy spread, puddled with rich, fruity olive oil.

The fair head is poached in a lovely, bubbling bath of white wine, lemon juice, olive oil and butter, stained and roasted in an 800-degree wood-burning oven. The whole head of cauliflower arrives dramatically at the table; singed with a Laguiole steak knife strategically plunged into its head, exposing a hint of winter white under the bronzed florets.

Domenica’s pizzas were outstanding, but it was this unusual, dramatic appetizer that grabbed my attention and did not dare let go. As we were about to walk back onto the streets of New Orleans, bellies full and spirits (and blood sugar) high, I turned and looked at the restaurant and spotted many a cauliflower heads and smiled. New Orleans knows how to feed its people and anyone else that walks across the city’s threshold.

Whole Roasted Cauliflower with Feta SpreadRecipe: From Domenica, Courtesy of Bon Appétit

Serves 6

Note: Whenever prepping the cauliflower head, pull back and discard the leaves and trim the core so that the whole head will sit flat on the roasting pan. Also, if you don’t care for the taste of wine, you can omit it; just add 2 ½ cups more water to the poaching liquid.

Roasted Cauliflower Ingredients:

2 ½ cups of dry white wine (optional)

1/3 cup of olive oil

1/4 cup of kosher salt

3 tablespoons of fresh lemon juice

2 tablespoons of butter

1 tablespoon of crushed red pepper flakes

1 tablespoon of sugar

1 head of cauliflower, leaves removed

Whipped Goat Cheese Ingredients and Assembly:

4 ounces of fresh goat cheese

3 ounces of cream cheese

3 ounces of feta

1/3 cup heavy cream

2 tablespoons olive oil, plus more for serving

Coarse sea salt and black pepper to taste

Roasted Cauliflower:

Preheat oven to 475 degrees

Bring wine (if using), oil, kosher salt, lemon juice, butter, red pepper flakes, sugar and 8 cups of water to a boil in a large pot. Add cauliflower, reduce heat to a simmer, turning occasionally, until a knife easily inserts into the center, about 15-20 minutes.

Using a mesh spider, drain the cauliflower well and transfer cauliflower to a rimmed baking sheet (make sure there is very little liquid remaining in the cauliflower or else smoke could pour out of your oven and make your smoke alarm go off and your neighbors would very much dislike you.) Roast, rotating sheet halfway through until browned all over, 30-40 minutes.

Whipped Goat Cheese and Assembly:

While the cauliflower is roasting, blend goat cheese, cream cheese, feta, cream, and 2 tablespoons oil in a food processor or blender until smooth, season with sea salt and black pepper to taste. Transfer whipped goat cheese to a serving bowl and drizzle with oil.

Transfer cauliflower to a plate. Drizzle with oil, sprinkle with salt. Place a steak knife in the middle of the roasted head of cauliflower. Serve with whipped goat cheese.